In Revit, don't you ever wish you could find out who was guilty of
screwing over your completely pristine BIM model? In software, we run
special tracking software so that we can monitor the history of every
single line of code, and blame whoever messed it up (literally, the
program is called git blame). Although in the architecture industry we
don't quite have this same fidelity of tracking (well, sort of, more on
that later), it's still possible to find out who touched any Revit
element last so we can interrogate them.
Finding out who last modified an element or created an element is actually a native Revit feature, but it is not very exposed on the user interface. First, I'll show you how to check it via the interface, and then I'll show you how to create a macro to check it from any view. I'll then also show you how to check the history of less obvious Revit elements, like who last modified the view template.
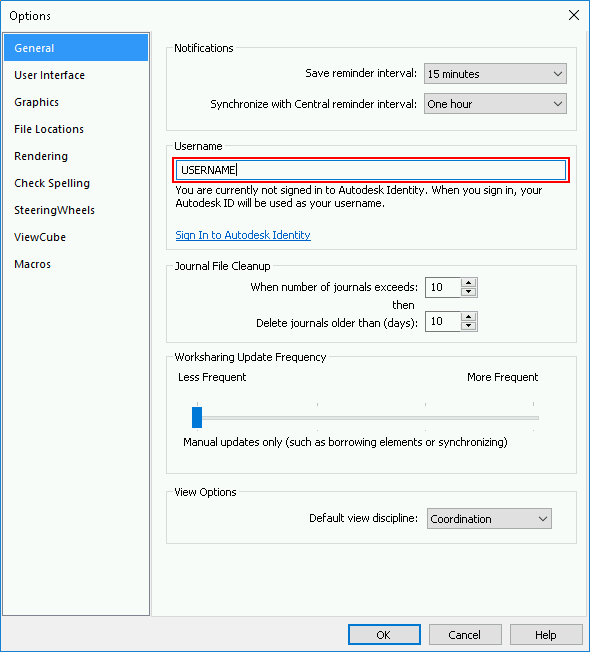
To do this, we are assuming there is a central Revit file and people are checking out local copies of it. We are also assuming that everybody has different Revit usernames. You can check your Revit username by going to Menu->Options->General->Username.
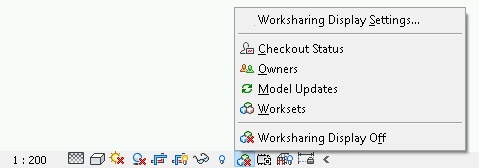
Then, turn on a worksharing mode. Any of the four available modes have this feature, so pick any that you'd like.
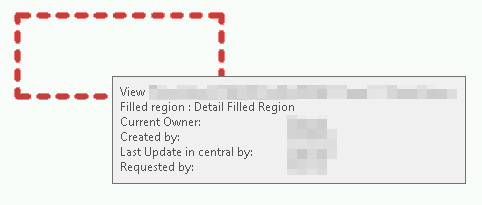
Once the mode is enabled, just hover over any element in your view, and a Revit tooltip will appear showing various information about who created it, who owns it, and who touched it last. I've censored it so you can't see who's guilty.
This is great and really easy. However to make things even easier I've written a macro that will allow you to click on any element without haven't to first switch display modes, and then it'll tell you who touched it last.
Go into the Manage tab and click on Macro Manager. Create a new
Module in Python, and dump the following code:
def Blame(self):
    select = self.Application.ActiveUIDocument.Selection
    el = self.Application.ActiveUIDocument.Document.GetElement(select.PickObject(ObjectType.Element, 'Get element'))
    info = WorksharingUtils.GetWorksharingTooltipInfo(self.Application.ActiveUIDocument.Document, el.Id)
    TaskDialog.Show('Blame', 'Created by: ' + str(info.Creator) + '\nLast changed by: ' + str(info.LastChangedBy))
Press F8 to compile the macro, then run it in the macro manager. After
clicking any element, you'll see a dialog box pop up. I like to assign a
keyboard shortcut to the macro manager to make this very quick to do.
If you feel the need to see the history of another less obvious / clickable element (say, a view template), you will need to first get its element ID. This is an integer that all elements in Revit have (note: it is not the GUID, which is a related but different thing). Using tools that allow you to query or browse the BIM database such as plugins provided by Ideate allow you to find out these element IDs.
Once you have the element ID, you can substitute the element acquisition
line in the code above with the below snippet, where XXXXXXXX is your
element ID:
el = self.Application.ActiveUIDocument.Document.GetElement(ElementId(XXXXXXXX))
There you have it - it's all fun and games until you realise that half the screw-ups are your own fault :)