Radiance is not often used to simulate fields of grass and heavily vegetated scenes like those often created by CG artists with other rendering engines. This is because exactly simulating the average luminance or illuminance on natural environments is not often required. This article will demonstrate how to render these types of scenes in Radiance.
The usual technique for rendering grass is to model some strands, and then place instances of those strands using an automatic system, such as a "hair", "particle", "duplivert", or "instancing" system that is provided with many modeling software such as Blender. Sometimes, the vegetation is purely a series of alpha-mapped plane. In other cases, such as for trees, the plant is generated and leaves appear at locations defined by an L-system or similar. All of these techniques can be used with Radiance.
As Radiance does not take shortcuts in its calculations, I would advise to minmise the polygons where necessary when rendering vegetation. With grass, don't model anything detailed. With groundcover and trees, use alpha mapped planes as much as possible.
Bake all the vegetation into a single mesh
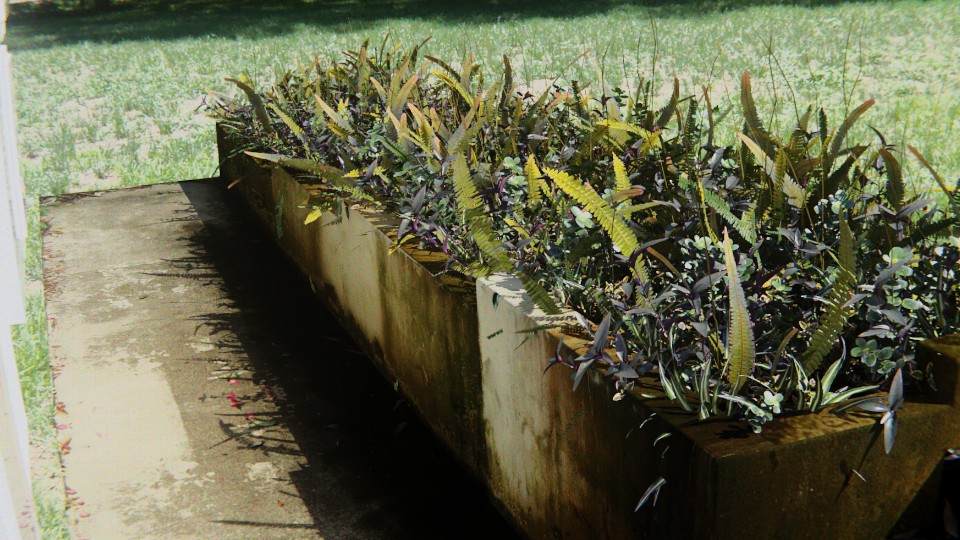
The simplest approach is to "bake" the generated vegetation into a static mesh and export it as an OBJ, regardless of what generated it in the first place. The mesh can then be included in a typical manner as described by my basic Radiance beginners tutorial. Despite its simplicity, there are a few disadvantages of this approach: firstly, the created OBJ can become extremely large, it also does not conserve memory on repeated elements when rendering, and it is an all or nothing approach, it is hard to turn on and off elements. That said, it is very, very easy, and so I use this approach to create a planter bed in my living room Radiance render.
With Blender, there is a trick to export complex particle creations into a single mesh without needing to bake it first, by linking the particle object into a fresh file and then exporting an OBJ.
Create many instances
Another approach is to ask Radiance to copy and paste and object many times.
Radiance has an instance object, which places a precompiled octree into a
scene. This conserves memory when rendering. Although it is tempting to create a
single strand of grass and then instance it 10,000 times, I have found Radiance
is not capable of dealing with this. I have found more than 500 instances of a
single type of octree to cause Radiance to take a long time to prepare for
rendering, as well as octrees of incredibly thin aspect ratio (i.e. a grass
strand) to be very difficult for Radiance to handle.
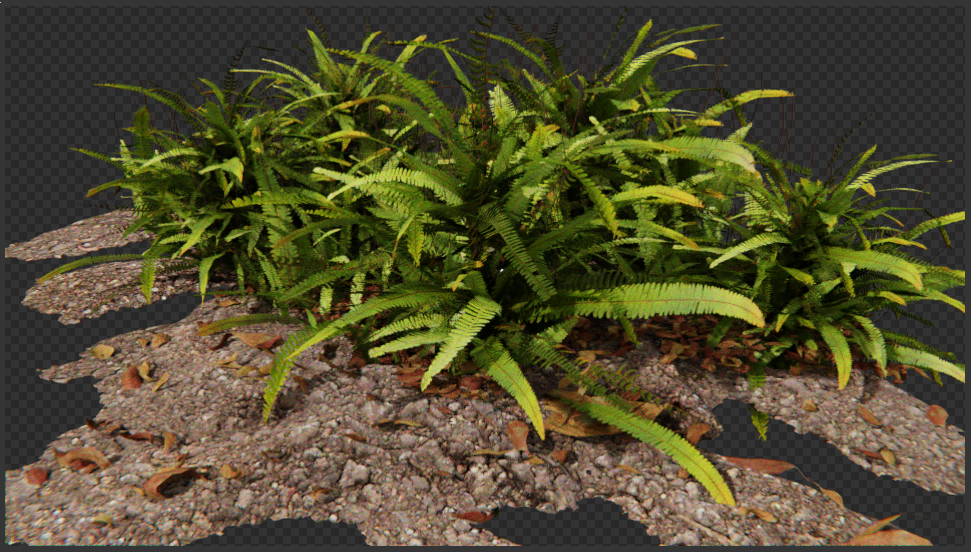
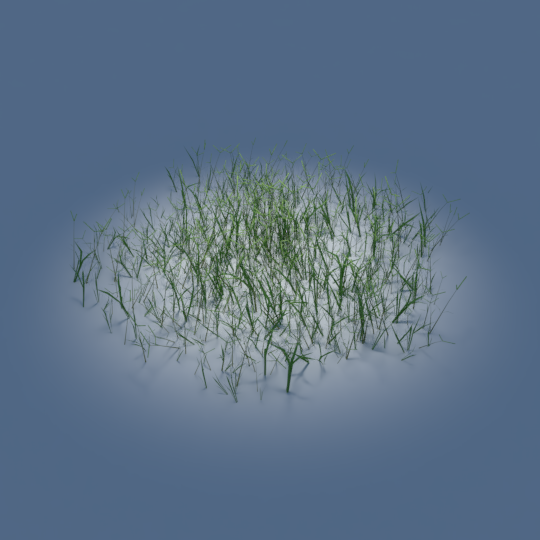
That said, as long as you limit the instance to have a balanced aspect ratio, such as a patch of vegetation, and do not go overboard in the number of instances, then this is a valid technique. Here is an example of an instance you might create which is not too long or thin.
The instance is then placed multiple times with different locations and rotations to build up complexity.
In Blender, there is a very easy way to do this, using a technique known as dupliverts. With this technique, a mesh is created where each vertex represents the origin of placing an instance. This Blender script automatically converts these vertices into Radiance instances:
import bpy
import math

# Path to the octree
octree = 'obj/bahia-grass.oct'
n = 0
with open('/tmp/particles.rad', 'w') as output:
    for vertex in bpy.context.active_object.data.vertices:
        output.write('void instance particle_{}\n5 {} -t {} {} {} \n0\n0\n\n'.format(
            n,
            octree,
            vertex.co[0],
            vertex.co[1],
            vertex.co[2],
        ))
        n = n + 1
This technique is especially useful when applied to groundcovers. A patch of groundcover is created, and then simply repeated a few times until it becomes convincing. I have released many types of plants in the free Radiance model repository where you can download and quickly create vegetation yourself.
Using alpha mapped planes for textures
Alpha mapped planes are a standard technique in the CG industry. Here is how to
define it in Radiance. First, we define diffuse-map, this is the diffuse
texture that we will use for our object. Then, we will apply to this a plastic
shader. Our plastic shader multiplies the RGB values of the diffuse-map by 1.
For more information about how to set a diffuse map, you can read how to use
macbethcal to calibrate
textures.
Then, my-material is defined, which is what will be assigned to our actual
object, using UV coordinates. An alpha-mask.hdr is provided where white is
visible and black is invisible. The mixpict will mix between the diffuse
material and a void (i.e. invisible) material, depending on the grey
function, which reads greyscale data from alpha-mask.hdr.
void colorpict diffuse-map
7 red green blue diffuse-map.hdr . frac(Lu) frac(Lv)
0
0

diffuse-map plastic diffuse
0
0
5 1 1 1 0 0

void mixpict my-material
7 diffuse void grey alpha-mask.hdr . frac(Lu) frac(Lv)
0
0
Front and back face materials
Plants are interesting from a material point of view because they often have a different material from the front face of leaves and the backface of leaves. For instance, the front face may be more specular or have a different colour.
This can be achieved in Radiance using a mixfunc as follows, which mixes
between the frontface and backface material, which is defined elsewhere.
void mixfunc my-material
4 frontface backface if(Rdot,1,0) .
0
0
Creating variations in colour
With autogenerated particle or hair systems, often colour can be varied. This can also somewhat be achieved in Radiance. One approach is to modify the instance script above to select from several preset octrees, each compiled with a different material.
Another approach is to use a calculation. Here is a crude example, saved as
random.cal, which pumps out a gradient of RGB along an objects local UV
coordinates.
{ A1 = 0-1, where 0 has no variation and 1 varies the colour to 0}
{
red = (((Lu + Lv) / 2) * A1) + (1 - A1);
green = (((Lu + Lv) / 2) * A1) + (1 - A1);
blue = (((Lu + Lv) / 2) * A1) + (1 - A1);
}
red = (((Lu + Lv) / 2) * A1) + (1. - A1);
blue = (((Lu + Lv) / 2) * A1) + (1. - A1);
green = (((Lu + Lv) / 2) * A1) + (1. - A1);
It is then applied as follows:
void colorfunc random-color
4 red green blue random.cal
0
1 .25